Embroidery has been used for centuries to decorate clothing, accessories, uniforms, and other textile products. Today, modern embroidery machines make it possible to reproduce logos, artwork, lettering, and detailed patterns with impressive consistency. But before a machine can stitch a design, the artwork needs to be converted into instructions that the machine can understand.
This process is known as embroidery digitizing.
Embroidery digitizing is more than simply converting an image into a file. It involves deciding how a design will be constructed with stitches, how different elements will connect, which stitch types should be used, and how the fabric will respond during production.
Understanding how embroidery digitizing works can help clothing brands, businesses, promotional companies, and anyone ordering custom embroidery get better results. From the original artwork to the final embroidery file, every stage has an impact on the quality of the finished design.
What Is Embroidery Digitizing?
Embroidery digitizing is the process of converting artwork into a digital embroidery file that contains instructions for an embroidery machine.
A regular image file, such as a JPG or PNG, contains pixels or visual information. An embroidery machine needs something completely different. It needs instructions telling it where to place stitches, what direction those stitches should follow, when to change thread colors, and how different parts of the design should be sewn.
A digitizer creates these instructions using specialized embroidery software.
The finished file may include information such as:
- Stitch type
- Stitch direction
- Stitch density
- Stitch length
- Sewing sequence
- Thread color changes
- Underlay
- Trims and jumps
- Starting and ending points
The goal is to transform visual artwork into a design that can be physically reproduced with thread.
Why Isn’t a Regular Image Enough?
A computer can display a logo simply by showing its colors and shapes. An embroidery machine cannot interpret those visual elements in the same way.
For example, a circular logo may look simple on a screen. But the digitizer must determine whether the circle should use satin stitches, fill stitches, or another construction method. The digitizer also needs to decide where the stitching should begin and how it should move around the shape.
This is why embroidery digitizing requires both software knowledge and an understanding of embroidery techniques.
How Does Embroidery Digitizing Work?
The digitizing process usually follows several important stages. Each stage helps prepare the artwork for successful machine embroidery.
1. Reviewing the Original Artwork
The first step is examining the artwork.
The digitizer looks at the overall design, including its shapes, lettering, colors, outlines, and small details. They also consider where the design will be embroidered and how large it will be.
A simple logo with bold shapes may be relatively straightforward to digitize. A detailed illustration with gradients, tiny text, and thin lines may require more planning.
2. Selecting the Right Stitch Types
Different areas of a design require different stitch structures.
Common stitch types include:
Running stitches: These are useful for outlines, fine details, and narrow elements.
Satin stitches: These create smooth, dense columns and are frequently used for lettering, borders, and narrow shapes.
Fill stitches: These cover larger areas with rows of stitches and are useful for backgrounds and broad shapes.
Choosing the right stitch type helps the design maintain its appearance when converted from artwork into embroidery.
3. Creating the Stitch Sequence
The order in which different sections are embroidered is extremely important.
A digitizer determines which elements should be stitched first and which should be completed later. Proper sequencing can reduce unnecessary thread changes, jumps, and trims.
It can also help prevent parts of the design from shifting or becoming distorted during production.
4. Setting Stitch Density
Stitch density describes how closely stitches are placed together.
If a design has too few stitches, the fabric may show through. If there are too many stitches, the design may become unnecessarily heavy and create problems such as puckering, stiffness, or thread breaks.
The appropriate density depends on factors such as the design, fabric, thread, and embroidery application.
5. Adding Underlay
Underlay is a foundation layer of stitching placed underneath the visible stitches.
It can help stabilize the fabric and provide a foundation for the top stitches. Underlay also helps improve coverage and maintain the shape of certain embroidered elements.
The amount and type of underlay should be selected according to the design and fabric rather than applied identically to every project.
6. Adjusting for Fabric Movement
Fabric does not remain completely still during embroidery. It can stretch, shift, or react to the pressure created by thousands of stitches.
Digitizers account for these characteristics through techniques such as pull compensation and appropriate underlay.
These adjustments help the finished embroidery maintain its intended shape.
From Artwork to an Embroidery File
The journey from artwork to embroidery file involves much more than pressing a conversion button.
Artwork Preparation
The process starts with artwork that clearly represents the intended design.
Vector artwork can be particularly helpful because it provides clean shapes and outlines. However, a professional digitizer can often work with other types of artwork as well.
If the original image contains unnecessary details, the artwork may need to be simplified before digitizing.
Design Mapping
The digitizer breaks the artwork into individual sections.
For example, a logo might contain:
- A background
- Text
- An outline
- A symbol
- Several colored areas
Each section may require a different stitch approach.
Digital Stitch Creation
The digitizer then creates the actual stitch paths in embroidery software.
Instead of simply tracing the artwork, the digitizer determines how thread should travel through each section.
This is one of the most important differences between image conversion and professional digitizing.
File Export
After the design has been created and reviewed, it can be exported into the embroidery format required by the machine.
Different machines support different formats, so the correct file type should always be confirmed before production.
Popular Embroidery File Formats
There are several embroidery file formats used by different machines and embroidery systems.
Some commonly encountered formats include:
DST
DST is one of the most widely used formats in commercial embroidery. It is commonly supported by many professional embroidery machines.
PES
PES is widely associated with certain Brother and compatible embroidery machines.
EXP
EXP is another format used with various embroidery systems and machines.
JEF
JEF is commonly associated with Janome embroidery machines.
The best format depends on the specific embroidery machine. If you are ordering a digitized design, provide the machine information or required file format to the digitizing service.
What Makes a Good Embroidery File?
A good embroidery file should not only open correctly on a machine. It should also produce clean and consistent stitching.
Several factors contribute to file quality.
Clean Stitch Paths
Stitch paths should be organized logically. Unnecessary movements can increase production time and create additional trims or jumps.
Balanced Density
The design should have enough stitches to provide proper coverage without creating unnecessary bulk.
Correct Stitch Direction
Stitch direction affects both appearance and structure. Carefully planned angles can help different areas of a design look distinct and polished.
Suitable Underlay
The right foundation helps support the visible stitches and stabilize the material.
Appropriate Compensation
Some fabrics cause embroidered elements to pull or shift slightly during stitching. Compensation can help account for these effects.
Why Fabric Matters in Embroidery Digitizing
The same embroidery file may not perform equally well on every fabric.
A cotton shirt, fleece jacket, denim cap, and performance garment all have different characteristics.
Lightweight Fabrics
Light fabrics may require careful density and underlay choices to avoid distortion or excessive weight.
Heavy Fabrics
Denim, canvas, and similar materials can support more substantial embroidery, but the digitizer still needs to consider stitch count and design construction.
Stretch Fabrics
Stretchable materials require additional attention because movement in the fabric can affect the final shape of the design.
This is why it is helpful to tell your digitizer what material you plan to use.
Does Design Size Affect Digitizing?
Yes. Design size can significantly affect how artwork should be digitized.
A logo intended for a large jacket back can contain more detail than the same logo reduced to a small left-chest design.
Small Designs
Small embroidery has limited space. Tiny letters, narrow lines, and small gaps may disappear when converted into stitches.
A digitizer may need to simplify these elements while preserving the overall appearance of the logo.
Large Designs
Large designs provide more room for details, but they can also require more stitches. The digitizer needs to manage stitch count, sequencing, density, and fabric stability.
For this reason, it is best to tell the digitizer the intended finished dimensions before the file is created.
Embroidery Digitizing vs. Image Conversion
It is easy to assume that embroidery digitizing is simply another form of image conversion. However, the two processes are very different.
Image conversion focuses on changing one digital image format into another.
Embroidery digitizing focuses on creating a physical stitching plan.
A digitizer must understand how thread behaves, how fabrics respond to stitching, and how embroidery machines operate.
This human decision-making is particularly important for logos with small details, lettering, complex shapes, or unusual applications.
Common Problems With Poorly Digitized Designs
A poor-quality embroidery file can create problems during production.
Puckering
Excessive density or insufficient stabilization can cause the fabric to gather around the design.
Thread Breaks
Poor stitch settings, excessive density, or problematic stitch paths can increase the likelihood of thread breaks.
Distorted Shapes
Incorrect sequencing or inadequate compensation can cause shapes to look different from the original artwork.
Poor Lettering
Small text can become difficult to read when it has not been properly adapted for embroidery.
Excessive Stitch Counts
An unnecessarily high stitch count can increase production time, thread consumption, and overall cost.
When Should You Use Professional Digitizing?
Professional digitizing is especially useful when embroidery quality matters to your brand or customers.
Businesses may need professional digitizing for:
- Company logos
- Employee uniforms
- Branded apparel
- Custom caps
- Jackets
- Promotional merchandise
- Sportswear
- Embroidered patches
- Detailed artwork
- Product collections
If you regularly reproduce the same logo, investing in a properly prepared embroidery file can also help maintain consistency across different products.
Services such as ZDigitizing can help convert business artwork into machine-ready embroidery formats while accounting for different applications and production requirements.
How to Prepare Artwork for Digitizing
You can make the digitizing process easier by providing useful information from the beginning.
Send the Best Artwork Available
Provide a clear version of your logo or artwork. If you have a vector file, include it when possible.
Specify the Finished Size
Tell the digitizer the approximate dimensions you need.
Identify the Product
Mention whether the design will be used on a shirt, cap, jacket, bag, towel, or another product.
Mention the Fabric
The material can influence stitch density, underlay, and other technical decisions.
Explain the Placement
Specify whether the embroidery will be placed on the left chest, sleeve, front of a cap, jacket back, or another location.
The more relevant information you provide, the easier it is to create a file suited to the actual application.
What Happens After the Embroidery File Is Created?
Creating the digital file is not necessarily the final step.
The design should ideally be reviewed or tested before large-scale production.
Test Stitching
A sample stitch-out can reveal problems that may not be obvious when viewing the design on a computer.
The test may show issues with density, lettering, thread coverage, registration, or fabric behavior.
Making Adjustments
If problems appear during testing, the file can be adjusted.
The digitizer may change stitch direction, density, underlay, sequencing, or other settings.
Final Production
Once the design performs correctly, the approved file can be used for production.
For businesses ordering large quantities, testing before full production can help prevent costly mistakes.
Conclusion
Embroidery digitizing is the process that transforms ordinary artwork into a practical set of stitching instructions for an embroidery machine. It involves much more than changing an image into a file. Stitch types, sequencing, density, underlay, fabric, size, and machine requirements all need to be considered.
A well-digitized design can produce cleaner embroidery, better consistency, and fewer production problems. Whether you are creating a company logo, custom apparel, promotional products, caps, or jackets, understanding the journey from artwork to embroidery file helps you make better decisions.
The right artwork, accurate specifications, and professional digitizing can turn a digital design into embroidery that looks polished and performs reliably.
Frequently Asked Questions
1. What is embroidery digitizing in simple terms?
Embroidery digitizing is the process of converting artwork into a machine-readable file that tells an embroidery machine how and where to place stitches.
2. Can a JPG or PNG be converted into an embroidery file?
Yes. JPG and PNG artwork can be used as a starting point for digitizing. However, the image must be interpreted and recreated as stitches rather than simply converted like a normal image file.
3. What is the most common embroidery file format?
DST is one of the most widely used embroidery formats, particularly in commercial embroidery. However, the correct format depends on the embroidery machine being used.
4. Why does the same logo need different digitizing for different products?
Different products and fabrics behave differently during embroidery. A logo for a cap may need different stitch settings and construction from the same logo used on a jacket or shirt.
5. How can I get better results from an embroidery digitizing service?
Provide clear artwork, the required embroidery size, fabric type, product information, placement, and machine file format. These details help the digitizer create a file specifically suited to your project.

 by
by 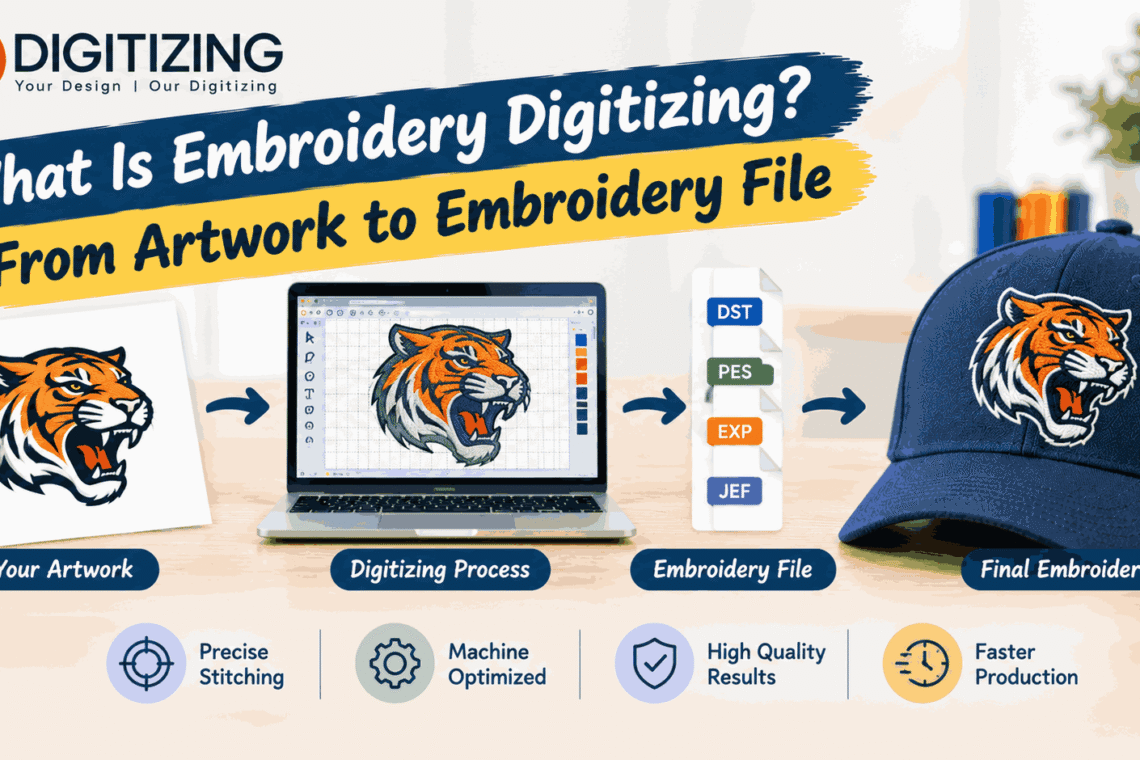





Join The Discussion